Cluttered cables and scattered chargers are a common headache for anyone who spends hours at a desk. Searching for the right charger in a tangled mess not only wastes time but can also damage your cords and devices. Many people underestimate how much a neat charging setup can improve productivity and reduce stress. By organizing your desk around a central charging station, you can streamline your workflow and protect your electronics. In this article, we will explore practical steps to choose, set up, and maintain a desk charging station for a tidy and efficient workspace.
Step 1: Audit Your Devices and Choose Your Station
List All Your Desk Devices and Their Charging Needs
Begin by making a complete list of all devices you regularly charge at your desk. Include smartphones, tablets, wireless earbuds, laptops, smartwatches, and any other USB-powered gadgets. Take note of the required power levels for each device and whether they support fast charging or wireless charging. This inventory will help you select a station that meets all your needs without overloading ports. Understanding exactly what you need ensures you purchase a station that serves your workflow efficiently.
Select a Station with Enough Ports and the Right Technology
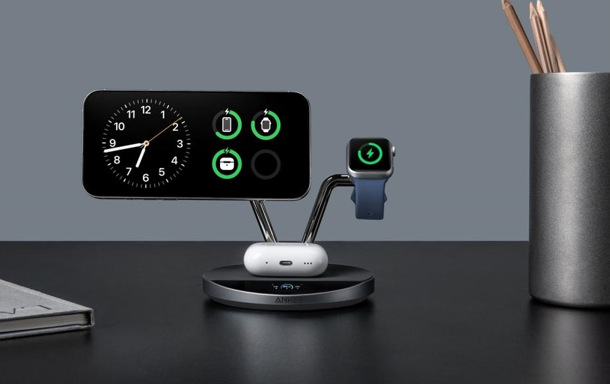
Once you’ve assessed your device lineup, select a charging station with the appropriate port selection and technology. A quality station will include USB-A, USB-C, and wireless charging pads to cover all bases. For Apple users, the ideal solution should charge multiple devices at once without speed reduction. This is where an Anker apple charging station shines, delivering reliable, simultaneous power to your iPhone, iPad, and AirPods. By prioritizing this versatility upfront, you’ll avoid the clutter and frustration of incompatible chargers down the line.

Step 2: Clear and Plan Your Desk Layout
Declutter Your Entire Desk Surface
Before setting up the station, remove all unnecessary items from your desk. Clear away papers, old cables, and unused gadgets. A clean surface gives you a better perspective on where to place your charging hub and ensures airflow around devices. It also reduces the risk of spills or accidental damage while charging. Decluttering first creates a sense of control and makes the next steps easier to execute.
Designate a Specific “Charging Zone”
Choose a permanent spot for your charging station where it will not interfere with daily desk activities. Ideally, this area should be easily accessible yet out of the way of your main work area. Positioning your station near an outlet and in a place with good airflow helps devices charge efficiently. Having a designated zone also trains your brain to return devices to the same spot consistently. This small planning step greatly improves organization and habit formation.
See also: Multi-Device Chargers: One Power Station for All Your Gear
Step 3: Set Up the Station and Manage Cables
Position the Station for Access and Airflow
Place your charging station so that each device can easily connect without awkward bending or stretching of cords. Ensure there is sufficient space around the station for air circulation to prevent overheating. Avoid placing it directly on soft surfaces that trap heat. Consider the station’s visibility; you should be able to quickly see which devices are charging at a glance. Thoughtful placement improves safety, convenience, and overall efficiency.
Route and Secure All Cables Neatly
Use cable organizers, clips, or sleeves to guide cords along your desk edges or under shelves. Avoid letting cables cross the main workspace where they can become tangled or damaged. Labeling cables can also help identify each device quickly. Keeping cables off the surface reduces visual clutter and the risk of accidental unplugging. Over time, this habit ensures that charging remains a seamless and stress-free part of your routine.
Step 4: Establish Your Charging Routine
Assign a Permanent Spot for Each Device
Each device should have a designated place on the station to avoid confusion. By assigning spots, you reduce the time spent searching for available ports and ensure that all devices are properly charged. Consistency also protects your devices from accidental falls or cable strain. When everyone in a shared workspace follows the same system, it keeps the area orderly and predictable. A structured setup encourages responsible charging habits naturally.
Create an “End-of-Day” Charging Habit
Develop a routine to return all devices to the charging station before leaving your desk each day. This ensures that every gadget is fully charged for the next work session. Making it a habit prevents last-minute scrambles when devices are low on battery. You can even pair this routine with quick desk cleanup, reinforcing an organized workspace. Over time, the habit becomes automatic, and your desk remains consistently tidy.
Step 5: Maintain the System
Regular maintenance prevents your system from reverting to chaos. Periodically check for frayed cables, loose connectors, and dust buildup on ports. Keep only the necessary devices and cables on the desk and rotate out any extras for storage or recycling. Clean the station and surrounding area weekly to maintain a pleasant and functional workspace. Small, consistent efforts make a huge difference in preserving a tidy and efficient desk over months and years.
Conclusion
Organizing your desk with a dedicated charging station simplifies your daily workflow and reduces stress from cable chaos. By auditing devices, clearing space, carefully setting up the station, and establishing consistent routines, you create a clutter-free environment. Integrating an Anker Apple charging station provides reliable and simultaneous charging for all Apple devices, combining convenience with efficiency. Following these steps ensures that your desk remains neat, productive, and ready for any workday without the distraction of tangled cords. A little planning goes a long way toward a consistently organized and functional workspace.